Russian manicure can instantly change the look of your nails. If you want to try this manicure it’s important to understand how to do a Russian manicure. This manicure is different and better than a regular manicure. In today’s post, I’ll introduce you to a Russian manicure and how to do a Russian manicure in detail.
What Is A Russian Manicure?
A Russian manicure is a manicure type that cleans nails and cuticles by using an electric file or drill. This manicure is also known as a dry manicure and e-file manicure. Here, your nails are cleaned and groomed without using water.
When you know what is a manicure, you’ll understand the overall process of a Russian manicure is a bit different. You can keep on reading to learn how to do a Russian manicure at home or a salon.
Also Read : What Are The Disadvantages Of A Pedicure You Must Know
How To Do A Russian Manicure?
Over here, you’ll get to know how to do a Russian manicure by using easy steps.
Step 1: Gather Necessary Tools

First, you must gather all the necessary tools required to do a Russian manicure. For this manicure, you’ll need a nail drill, nail file, nail trimmer, nail polish remover, cuticle pusher, and trimmer. Other items like a fluffy brush, cuticle oil, cuticle cream, nail polish, and UV light are also required. You can easily find all nail grooming supplies on Amazon or nearby beauty stores.
Step 2: Clean and Prep Your Nails

Start by removing the existing nail polish from your nails by using a nail polish remover. As it is a waterless manicure, use nail prep pads to clean your nails. This will remove all dust and oil from your nails.
Step 3: Focus On Cuticles

Let’s now move forward with the next step which is cuticle care. By using an electric nail drill, remove all dead skin cells from nail beds. You can use the same tool to remove cuticles under nail beds. With a cuticle trimmer and pusher, gently trim and push back cuticles. Now, remove all the dust particles by using a fluffy brush.
Step 4: Nail Grooming

Before you start grooming your nails, decide whether you want round, square, oval, or almond-shaped nails. To create the desired shape, you need to file, shape, and buff your nails using an electric nail drill. Make sure you work with caution without affecting your nails.
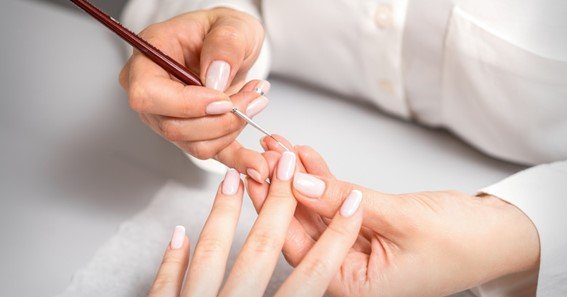
Step 5: Apply Nail Polish

Your nails are now ready to get painted! Start with applying a special base coat (only used for Russian manicures) on each nail. This special base coat helps to strengthen your nails. Now, place your fingers under a UV light for 30 seconds to cure this base coat.
Once the base coat is cured properly, apply a colored gel polish of your choice. Again, place your fingers under a UV light for 45 seconds to cure the polish. You can apply a second layer of gel polish for a rich color payoff.
Lastly, apply a layer of top coat to seal your gel polish. Make sure you cure the top coat under a UV light for 30 seconds. Remember curing each coat properly is important if you want long-lasting results.
Step 6: Apply Moisturizer

Once you are done with the manicure, apply a good layer of moisturizer to your hands. This will keep your hands hydrated and nourished. Make sure you also apply cuticle oil or cuticle cream to your fingernails. Cuticle oil or cream will make your nails strong, healthy, and less prone to breakage.
The main goal of Russian manicures is to get healthy and long-lasting nails. You can also check out this Russian manicure tutorial to understand this manicure technique.
Also Read : How Long Does A Manicure Take and How Often Should You Do It?
Tips To Remember Before Doing A Russian Manicure
I hope now you’ve understood the step-by-step procedure of how to do a Russian manicure. As this manicure is different from regular manicures, here are some tips you must remember before getting a Russian manicure.
- If you are using the electric nail drill for the first time, start with the minimum speed. You can gradually increase the speed whenever it is necessary.
- Make sure you use slow movements and light pressure while working with the nail drill.
- Be extra cautious while cleaning your cuticles to prevent any cuts from occurring.
To Conclude
In the above post, I’ve briefly explained how to do a Russian manicure without damaging your cuticles. You can easily get professional-looking Russian nails at home by using these simple steps. Here, your nails and cuticles are cut and removed by using an electric nail drill. Always remember that a beauty treatment is safe only when a well-trained expert does it. You can do this manicure service by yourself only when you have proper training.
FAQ
How Long Will My Russian Manicure Last?
Your Russian manicure will last for up to three weeks without any chipping.
Who Should Avoid Getting A Russian Manicure?
A Russian manicure is not suitable if you have thin nails, fungal infections around your nails, and have previous skin injuries.
How Russian Manicures Are Good For Nails?
Russian manicures are good for your nails as it gives you clean, beautiful, long-lasting nails. The best part of this service is that your nails don’t require touch-ups like gel or regular manicures.
How Long Will A Russian Manicure Last?
A Russian manicure can last up to four weeks approximately if gel polish is applied to your nails. Otherwise, this manicure can last at least one to two weeks approximately if a regular nail polish is applied.